I accidentally deleted important work files from an external drive and now I’m trying to figure out the best software to get them back. I’ve narrowed it down to Disk Drill and EaseUS, but I’m not sure which one is more reliable, safer, and worth paying for. Can anyone share real experiences or recommendations comparing Disk Drill vs EaseUS for data recovery on Windows?
Okay, so here is how this went for me the first time I had to deal with “real” data loss, not the oops-I-hit-undo kind.
I wasn’t comparing feature tables. I was half panicking at 1 a.m. staring at a drive that Windows was calling RAW and asking to format. The whole “read reviews, compare specs, weigh pros and cons” routine goes straight out the window once it is your files on the line.
What you want in that moment is simple: go from “everything is gone” to “it is back” without feeling like you need a CS degree.
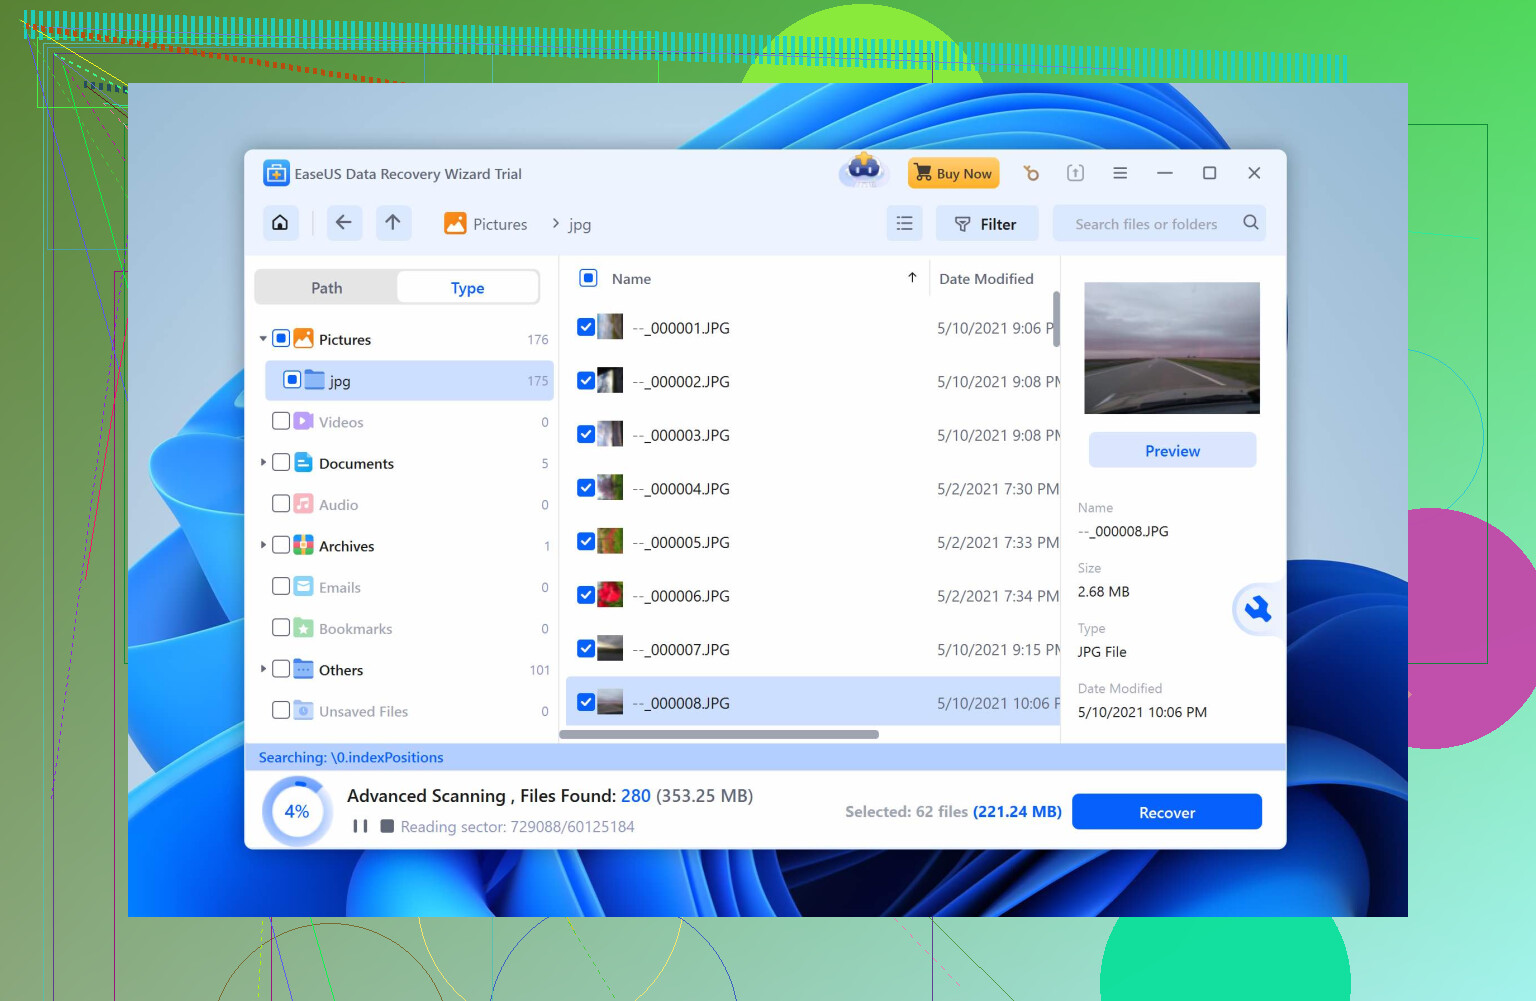
My first attempt with a popular free tool
The first tool I tried was one everyone on Reddit recommends. You have seen it mentioned a thousand times.
I install it, open it, and instantly hit a wall.
Pick scan type.
Pick file system.
Pick signatures.
Pick sector size.
I am sitting there thinking: I plugged this drive in and used it, it broke, I want it fixed. That is the entire story. I have no idea which scan mode fits that.
So I guess my way through the menus.
Scan takes about 45 minutes. When it finishes, the result looks like a dump of random junk:
• No real folder tree
• Lots of “found” files with generic names
• No proper preview for half of them
• Weird codes and flags I do not understand
I select a batch of photos and videos and send them to another drive.
About half the photos are corrupted.
Some of the videos do not play at all.
No warning, no way to know ahead of time which ones were dead.
That hour felt wasted. Drive still a mess, and my stress level worse than before.
Same drive, different tool, different outcome
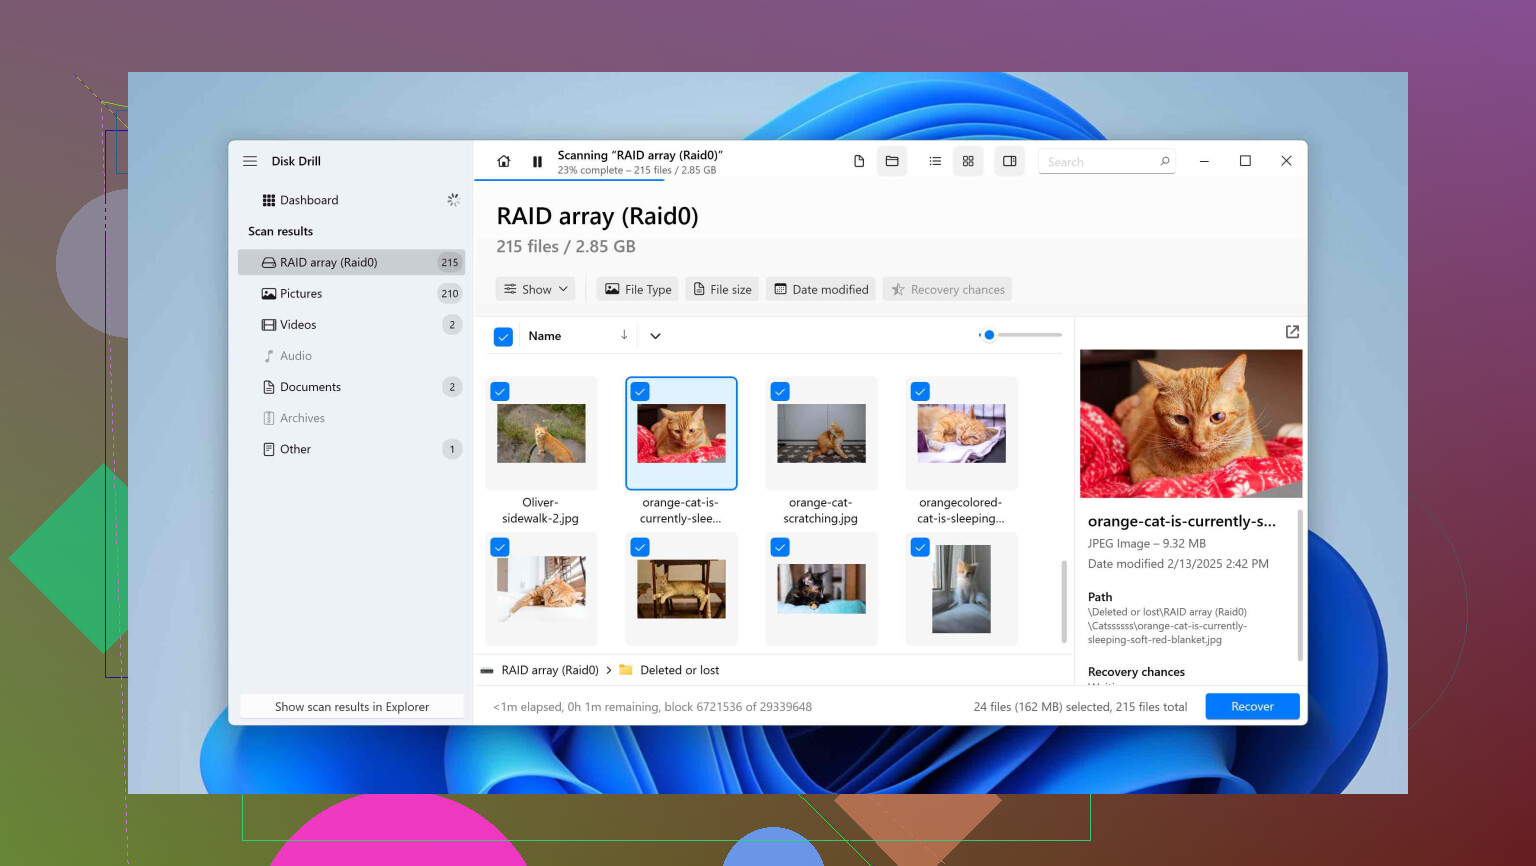
After that mess I tried Disk Drill.
The thing that surprised me was not a single “killer feature”. It was that I did not have to think much.
What I saw after launching it:
• A plain list of drives with size, file system type, and basic status
• I clicked the external drive
• One clear scan button, no interrogation about modes
Within maybe thirty seconds, files started populating the results. Not as one flat mess, but grouped into:
• Pictures
• Video
• Documents
• Audio
I clicked on a photo and it opened at full size in the preview. Clicked on a video and it played inside the app. Each file had a simple recovery chance indicator next to it: high, medium, low.
Same broken drive I had failed with on the previous tool recovered in about ten minutes of scanning. I previewed the important stuff, ticked the boxes, chose another drive as the destination and ran the recovery.
From panic to finished recovery took around twenty to twenty‑five minutes including the download.
If you want more detail from someone else, there is a decent writeup here:
Control vs overload
Every time someone says “X has more advanced settings” or “Y gives you full control of scan parameters”, I think back to that first attempt.
If you work in forensics or run a proper lab, fine, knobs and sliders help. If you are a normal user who deleted the wrong folder or has a bad SD card, that extra control turns into extra risk.
Each dropdown is another chance to pick something wrong.
What Disk Drill did right for me:
• It runs all its scan methods automatically in one pass
• It merges the results in a single view
• You only dig into the technical layers if you want to
If you know what you are doing, there are options:
• Separate views of different scan methods
• Scan map details
• A hex viewer
The difference is you are not forced into that level of detail before you even get to see your missing files.
The “middle step” almost no one talks about
People usually talk about “scan speed” and “what file types it supports” and then skip the part in between: going from scan results to a clean, usable recovery.
Most tools spit out lists like:
• A pile of filenames sorted by type
• Or a giant flat tree of “Found files” with no structure
• Weak or no preview
You then roll the dice: select some, recover them, inspect the result, repeat.
This is where Disk Drill felt less painful:
• If folder structure is recoverable, you see it like a normal file explorer tree
• If the structure is gone, you still see things organized by file type categories
• Filters by type, size, date, and the recovery chance flag
• Previews are full viewers, not tiny postage stamps
The recovery chance rating is not vague marketing text. After recovering hundreds of files over multiple incidents, I saw:
• “High” very often meant fully intact
• “Low” usually flagged trash ahead of time
Being able to trust that label saved time and avoided copying junk over and over.
SD cards, cameras, drones, and the fragmentation mess
This part I learned the hard way with camera footage.
Cameras and drones do weird things on SD cards compared with a PC. GoPro, DJI, Canon, Sony, they split recordings into fragments sprinkled across the card instead of one clean block per video.
When the file system map is healthy, the camera knows how to stitch those pieces in order. Once the card is corrupted, formatted, or the table gets damaged, that map disappears.
Many tools handle this by:
• Scanning for file signatures
• Grabbing data until the next signature
• Saving it as a “found” video
On heavily fragmented cards this works badly. You end up with:
• Clips that play for a while, then turn into garbage
• Sudden jumps to frames from other videos
• Files that crash your player
I have seen plenty of posts like “I recovered all my GoPro videos but they are broken”. Same pattern.
Disk Drill’s “Advanced Camera Recovery” behaved differently in my tests.
What it does, from what I can see:
• Uses device‑specific knowledge for brands like GoPro, Canon, DJI
• Identifies fragments that belong to one stream
• Reassembles them in correct order into one proper file
I wiped a DJI card by mistake that had four long flights recorded. Fully fragmented. Used Advanced Camera Recovery on it.
Result:
• Four playable videos matching the originals from start to end
• No weird transitions
• No glitch frames
• No audio dropouts
Then I tried two other tools on the same wiped card:
• One produced four files that none of my players could open
• The other produced a handful of short fragments, each only a few seconds, mostly corrupted
Same card, three tools, three outcomes. Only Disk Drill gave me usable footage.
If you never touch cameras, maybe this does not matter for you. If you record weddings, trips, drone shows, or family stuff, this single mode is the whole difference between “trip saved” and “trip gone”.
Drives that are dying slowly
I learned this only after reading professional recovery forums: the worst thing you can do with a failing mechanical drive is hammer it with a long scan.
When a drive is on its way out:
• Read operations become slow and unreliable
• Repeated reads stress the mechanics
• A full scan hits every sector, which is thousands of reads
So if you point a recovery app at the drive and let it go for ten hours, you risk pushing it from “barely responsive” to “brick” in that same session.
The standard advice from pros is:
- Make a sector‑by‑sector clone image of the failing drive
- Do all recovery on that image, never on the physical drive
Disk Drill has a byte‑to‑byte backup function that aligns with that workflow.
What stood out for me was how it dealt with problem areas during imaging:
• First pass moves fast and skips sectors that time out or error out
• Later passes focus on the skipped zones and attempt smaller reads there
• You see a color map of the image: green copied, gray pending, red failed
• You can pause, resume, and do this in sessions if the drive is on the edge
I used this with a USB drive that had:
• Clicking noises
• Extremely slow mounting
• Windows throwing I/O errors frequently
I imaged it in Disk Drill, then unplugged the actual drive and put it away. Recovery was done against the image only.
I got everything important out.
That physical drive stopped working entirely about a week and a half later. No spin up, no detection by BIOS. If I had run a long scan on it from the start, there is a good chance it would have died mid process.
S.M.A.R.T. status and early warning
Disk Drill also reads S.M.A.R.T. data from connected drives. For anyone not familiar:
• S.M.A.R.T. is a set of health indicators built into HDDs and SSDs
• It tracks things like reallocated sectors, read error rates, temperature history, uptime
Most people never open a S.M.A.R.T. viewer until it is too late.
Disk Drill displays this in a simple way. You see if something looks healthy or if it is trending bad, no need to parse hex values.
In my case, it helped me spot:
• One HDD with reallocated sectors growing over a few weeks
• One SSD with a worrying media error count
Both times I had enough time to move everything off and replace the drive before any data loss event. Not flashy, but avoiding a recovery job is the best outcome.
Recovery Vault and “silent protection”
I almost skipped Disk Drill’s Recovery Vault feature because it sounded gimmicky at first.
Here is what it does in practice:
• You assign folders that matter, like Documents, projects, Desktop
• Disk Drill silently tracks metadata about deleted items from those folders
• It does not copy full file contents, so disk usage is small
That metadata contains original file names and paths, which drastically improves how clean recoveries look if you delete something later.
Months after enabling it, I deleted a working document from a project folder by mistake, then emptied the Recycle Bin before noticing.
Using Disk Drill with Recovery Vault:
• File came back in seconds
• Original name and folder were intact
Without that, the same file would have turned up as some generic name under “Found files”, buried among many others.
If you ever have to recover dozens or hundreds of files, having correct names and paths preserved saves you a ton of re‑sorting.
Using it on both Windows and Mac
I split my time between Windows and macOS.
Disk Drill licenses cover both. That part is convenient, nothing special.
The thing I did not expect to use much, but ended up using, is shared scan sessions:
• Start scanning a drive on a Windows system
• Save the session
• Open that session on a Mac and continue from there
I have done this when:
• I start a heavy scan at my desk, then need to leave and continue on a laptop
• One machine has better storage available for recovered output
• A drive is plugged into one computer but I want to inspect results in a more comfortable environment
Not life changing, but it made a few recoveries less annoying.
Limits and where it does not help much
It is not perfect.
Cases where I would not pick Disk Drill:
• You deal with complex RAID setups and want low‑level control of every stripe and block
• You must run everything natively on Linux only
In both of those situations, specialized tools are more appropriate.
Where it fits well
For everything else I have run into personally:
• Corrupted external HDDs and USB sticks
• Wiped or formatted SD cards from cameras and drones
• Drives that are slowing down and throwing read errors
• Accidental deletes from work folders
Disk Drill hit a useful balance.
The free build lets you:
• Do full scans
• See a complete preview of what is recoverable
For small recoveries, that might be enough by itself. For bigger jobs, at least you know what you are paying for before you commit.
The camera recovery mode has been the standout feature for me. I have not found another general tool that reconstructed fragmented GoPro or DJI footage anywhere near as cleanly in my own tests.
What I would tell someone deciding right now
If you are in that “oh no, I lost something important” moment, do this:
- Stop writing anything to the affected drive or card.
- Download Disk Drill.
- Run a scan and rely on previews and recovery chance flags.
- If the drive seems physically weak, use the byte‑to‑byte image feature first, then scan the image.
- If you keep the tool, turn on Recovery Vault for your critical folders so next time is easier.
And whatever else you are comparing it to, try it on your actual broken device, not on theory or marketing pages. My experience has been that once people see the live preview of their own files, decision gets simple.
13 Likes
For what you describe, I would pick Disk Drill over EaseUS, with a small caveat.
EaseUS Data Recovery Wizard is solid, but it leans a bit more “utility” and a bit less “hand-holding”. Disk Drill is better if you are stressed, short on time, and do not want to fiddle with modes.
Quick comparison from actual use:
-
Ease of use
Disk Drill
• One main scan button, no early tech choices.
• Clear file categories and strong preview for photos, docs, videos.
EaseUS
• Simple too, but menus and options feel busier.
• Preview works, but in my experience not as smooth with large batches. -
Folder structure and filenames
Disk Drill
• Often restores original folder tree on external drives, if metadata survives.
• When not possible, groups by type and lets you filter fast.
EaseUS
• Also restores structure, but I got more “raw” buckets with generic names on damaged drives. -
Success rate for external drives
From my own jobs and what I see in threads, plus what @mikeappsreviewer described, Disk Drill tends to do better on:
• Drives that went RAW.
• SD cards from cameras and drones.
EaseUS does ok on simple “deleted file” situations, but it struggled more for me when the file system was damaged. -
Special cases
Disk Drill
• Advanced Camera Recovery is strong for GoPro, DJI, DSLR footage. If your files included any media from those, Disk Drill is the safer pick.
EaseUS
• Better if you care about slightly broader platform mix including some server use, but that is not your case here. -
Pricing and limits
Both are paid for larger recoveries.
Key advantage for Disk Drill for your situation:
• You scan and preview everything before paying. This helps you see if your work files look intact.
Where I slightly disagree with @mikeappsreviewer
If you like having knobs and settings and you know file systems, EaseUS gives you a bit more direct “toolbox” feel. So if you are comfortable tweaking things, EaseUS is not a bad option. For most users with one bad external drive, the extra control adds friction without extra results.
Practical steps for you right now
- Stop using the external drive completely. Do not copy anything to it.
- Install Disk Drill on a different drive, not the one you want to recover.
- Run a scan on the external drive.
- Use preview to check your key work files.
• If previews open and look correct, pay and recover.
• If previews fail or look corrupted, recovery odds are low, so do not waste more tools on the same drive unless you go to a pro lab.
If the drive shows any slow reads or clicking, use Disk Drill’s “byte to byte backup” first, then scan the image. That matches what data recovery pros recommend and reduces risk.
If you want to read a more in depth take, this is helpful:
detailed Disk Drill review for safer data recovery
Short version for your case with deleted work files on an external drive
Pick Disk Drill first.
Try EaseUS only if Disk Drill shows nothing useful in preview, which is rare in simple delete scenarios.
Short version: in your situation, I’d start with Disk Drill, keep EaseUS as a backup option, and only bother with both after you’ve seen what each one actually finds on that specific drive.
Both @mikeappsreviewer and @viaggiatoresolare already covered the “I’m panicking at 1 a.m. with a RAW drive” angle really well, so I’ll skip repeating the same step‑by‑step and focus on how to pick between the two strategically.
1. What actually matters for you (not on paper)
You said: deleted important work files from an external drive.
Key points:
- External drive, not system disk
- Accidental delete, not complex RAID, not a NAS, not a server
- You probably care about:
- Original filenames & folder structure
- Whether recovered docs actually open (Office, PDFs, maybe project files)
- Not spending half a day learning file system theory
In that context, the differences that matter are:
Disk Drill
- Very good at surfacing your files quickly without config hell
- Strong previews for docs and images so you know what’s actually intact
- Better workflow if you’re stressed and not in the mood to fiddle with settings
- Solid with RAW / partially corrupted externals, which matches what both @mikeappsreviewer and @viaggiatoresolare ran into
EaseUS Data Recovery Wizard
- Also capable, but feels more like a “utility toolbox” than a guided experience
- On mildly damaged drives, it can perform similarly
- The interface can feel a bit busier and, on messy drives, the results tree tends to get uglier faster
So, for a single external drive with work files, Disk Drill is usually the cleaner choice.
2. Where I slightly disagree with them
Both of them lean pretty clearly to Disk Drill, and I mostly agree, but:
-
If you are very comfortable with tech and actually want more knobs,
EaseUS can sometimes be useful. I’ve seen cases where someone who knows what they’re doing squeezed a bit more from EaseUS on very simple “I deleted it five minutes ago” situations because they knew exactly where to look and what to filter. -
If your drive is completely healthy and you just nuked a folder,
either tool will likely find the files. Disk Drill still wins on ease of use, but in that very clean scenario you won’t see a huge difference in raw success rate.
That said, once the file system starts going weird or the drive goes RAW, the balance pretty much tilts back to Disk Drill in real‑world usage.
3. How I’d actually decide, step by step (without repeating their whole tutorial)
Not rehashing @mikeappsreviewer’s “panic > scan > preview > recover” playbook, but this is the decision logic I’d use:
-
Stop touching the external drive
No more copying, no more “test saves,” no quick formats. Every write risks overwriting what you want back. -
Install Disk Drill on a different drive
System SSD or some other disk, not the one you’re trying to save. -
Run a scan and judge it by three things only
- Do you see your folders or at least file names that make sense?
- Do previews of the important files actually open and look normal?
- Does the “recovery chance” look mostly high/medium for your key stuff?
-
If Disk Drill shows clean previews of your important files
At that point, there’s no reason to bring EaseUS into it. Pay once, recover, be done. -
If Disk Drill shows only fragments, garbage names, or previews fail
- Trying EaseUS is fine, but temper expectations.
- If both tools show garbage previews, software is probably not your problem anymore; that’s where a pro lab is the next (expensive) step.
This is where I diverge a bit from the “try multiple tools just in case” crowd: if Disk Drill shows obviously damaged previews, running five more utilities rarely magically fixes corruption. You just burn time and stress.
4. Extra detail most people skip: what “data loss” really is
A lot of the frustration comes from not knowing what actually happened on disk. This explains why sometimes Disk Drill or EaseUS look like heroes, and other times like scammers.
If you want a plain‑english breakdown, this page on
how real-world data loss actually happens and what you can still fix
does a good job of explaining:
- What happens when you delete a file vs format a drive
- Why using the drive after deletion makes recovery worse
- The difference between logical damage (file system mess) and physical damage (bad sectors, failing heads)
- When consumer tools like Disk Drill still work and when you’re in “clean room” territory
Readable, not super technical, and helpful for understanding why one tool might appear to “miss” files that another finds.
5. When EaseUS might be worth trying second
To be fair to EaseUS, I’d still consider it if:
- Disk Drill finds some of your files, but misses a few specific ones you absolutely need
- The drive seems healthy, no weird delays or noises
- You’re OK spending more time nursing a second scan
Just don’t install EaseUS to the same external drive and don’t keep bouncing files on and off that drive while testing.
6. Straight answer to your question
Given:
- External drive
- Deleted work files
- You’re deciding Disk Drill vs EaseUS right now
Pick Disk Drill first.
If Disk Drill shows your important files with good previews, pay for it, recover to a different drive, and move on with your life. Only touch EaseUS if Disk Drill’s preview results are weak and the drive still looks physically fine.
And once you’re out of this mess, take 5 minutes to set up something like Disk Drill’s protection features or just a boring backup routine so you don’t end up back here at 1 a.m. doing comparison shopping in a panic again.
If the choice is strictly Disk Drill vs EaseUS for that external drive, I’d lean Disk Drill first, with EaseUS as a “second pass” only if needed.
Where I agree with @viaggiatoresolare, @cazadordeestrellas, and @mikeappsreviewer
They all landed on a similar theme: when the drive looks scary (RAW, odd behavior), Disk Drill keeps you out of decision fatigue. For non‑forensics users who just want their work files back, that matters more than having a wall of options.
Where I slightly disagree
I actually think EaseUS is not pointless here. If your external drive is healthy and this is a straight “deleted yesterday” scenario, EaseUS can perform similarly. In a couple of light‑damage cases, I have seen it list certain recently deleted items slightly more cleanly than Disk Drill. It is just not enough of an advantage to start there.
Disk Drill: pros & cons for your situation
Pros
- Very low friction: pick the external drive, start scan, done
- Strong previews for Office docs, PDFs, images and videos so you can tell what is actually usable
- Sensible layout of results: folder tree when possible, type‑based groups when not
- Good with RAW / damaged file systems, which matches the kind of mess that often happens with external drives
- Byte‑to‑byte image feature helps if the drive is acting flaky or slow
- Works on both Windows and macOS with one license, handy if you jump machines
Cons
- Not the cheapest if you only need it once for a tiny recovery
- The “all‑in‑one scan” can be slower than a targeted quick scan in some simple delete cases
- Weak on advanced RAID scenarios, so if that external were actually part of something more complex, you would outgrow it
- Protection features like Recovery Vault only help for future incidents, not this one, so they can feel like bloat right now
How I would approach your exact case
- Install Disk Drill on a different drive than the one you lost files on.
- Run a full scan on the external.
- Judge the tool only on three things:
- Do you see recognizable folder names or at least filenames that mean something to you
- Do previews of your key work files open and look normal
- Are most of those marked with a high or medium recovery chance
If that looks good, I would not bother with EaseUS at all. Pay, recover to another healthy drive, and be done.
If Disk Drill shows mostly garbage filenames, broken previews, or very low recovery chance for the files you care about, then trying EaseUS as a second shot is reasonable, but expectations should be modest. When both tools struggle like that, the problem is usually the underlying data, not the software brand.
In short: for an accidentally deleted work folder on an external drive, Disk Drill is the better first pick. EaseUS is the “maybe” you try afterward only if Disk Drill’s previews tell you the situation is already borderline.