A video transfer from my SD card to my computer failed, and now several important videos are missing from the card. I’m trying to figure out if the files were deleted, corrupted, or just not showing up, and I need help with the best way to recover them safely without making things worse.
Losing a video you needed feels bad every single time. I’ve done it once with a trip clip, once with work footage, and both times the first mistake was panic. If your video vanished because you deleted it, formatted the card, or your camera started throwing card errors, the first job is simple. Stop touching the card.
Deleted footage often sits on the card until new data lands on top of it. So if you quit using it fast, your odds are still decent.
First thing, pull the card
Take the memory card out of the camera right away.
Do not record more video. Do not snap photos. Do not format it. Every new write cuts into what you might still recover.
And yeah, I know plugging the camera in with USB feels easier. I tried that before. A separate card reader is usually the safer move for recovery.
Check whether your computer still sees it
Put the card into a card reader and connect it to your computer.
If Windows sees the card at all, even if it shows up as RAW, Unallocated, or asks you to format it, recovery software still has something to work with.
If it does not show in File Explorer, open Disk Management and look there. I’ve had cards missing from Explorer but still listed in Disk Management, which was enough to scan them.
Use a tool made for video, not one made for office files
This is where people get tripped up.
A lot of recovery apps do fine with JPGs and Word docs, then fall apart with camera footage. Video from cameras, drones, dashcams, and action cams often gets split into tons of fragments across the card. Old scan methods miss pieces or rebuild the file wrong, so you end up with broken clips, half clips, or files that look fine until playback dies at 11 seconds.
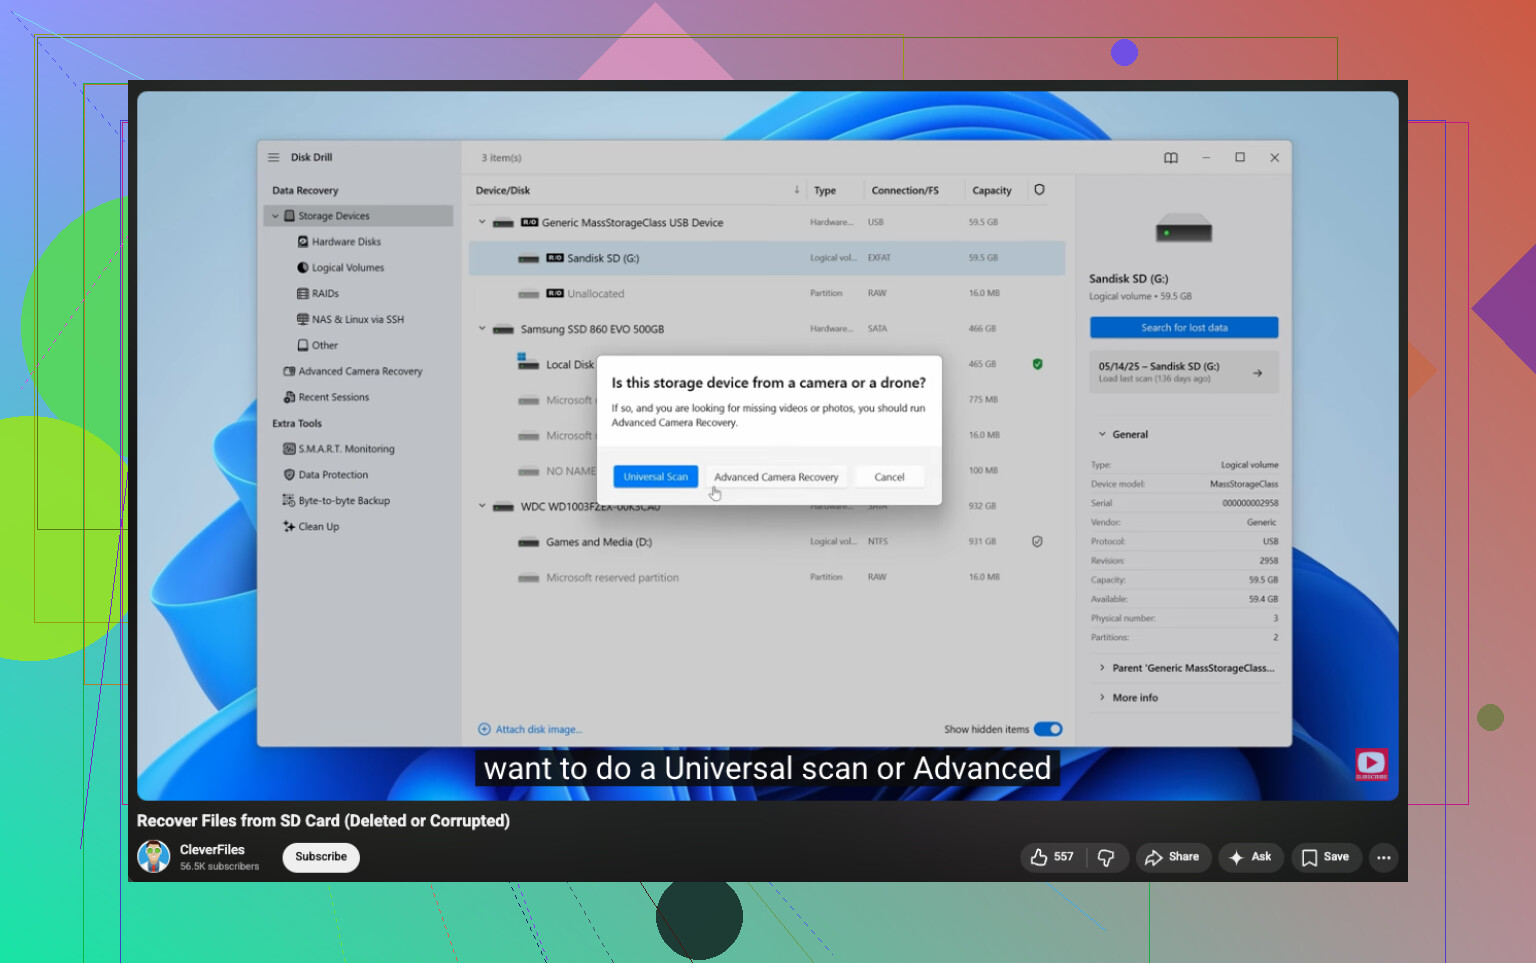
What worked better for me was Disk Drill.
The reason I bothered with it was its Advanced Camera Recovery mode. It is built for fragmented camera video. Instead of grabbing the file header and hoping for the best, it tries to sort video chunks back into the right order. On stuff like GoPro, DJI, Sony, Canon, Nikon, Insta360, and dashcam footage, this matters a lot more than people think.
The basic recovery flow
Here’s the short version I followed:
- Install Disk Drill.
- Connect the original SD card with a card reader.
- Open Disk Drill.
- Pick the card from the device list, hit Search for lost data, then choose Advanced Camera Recovery.
- Let the scan finish. Don’t stop it early unless the card starts acting weird.
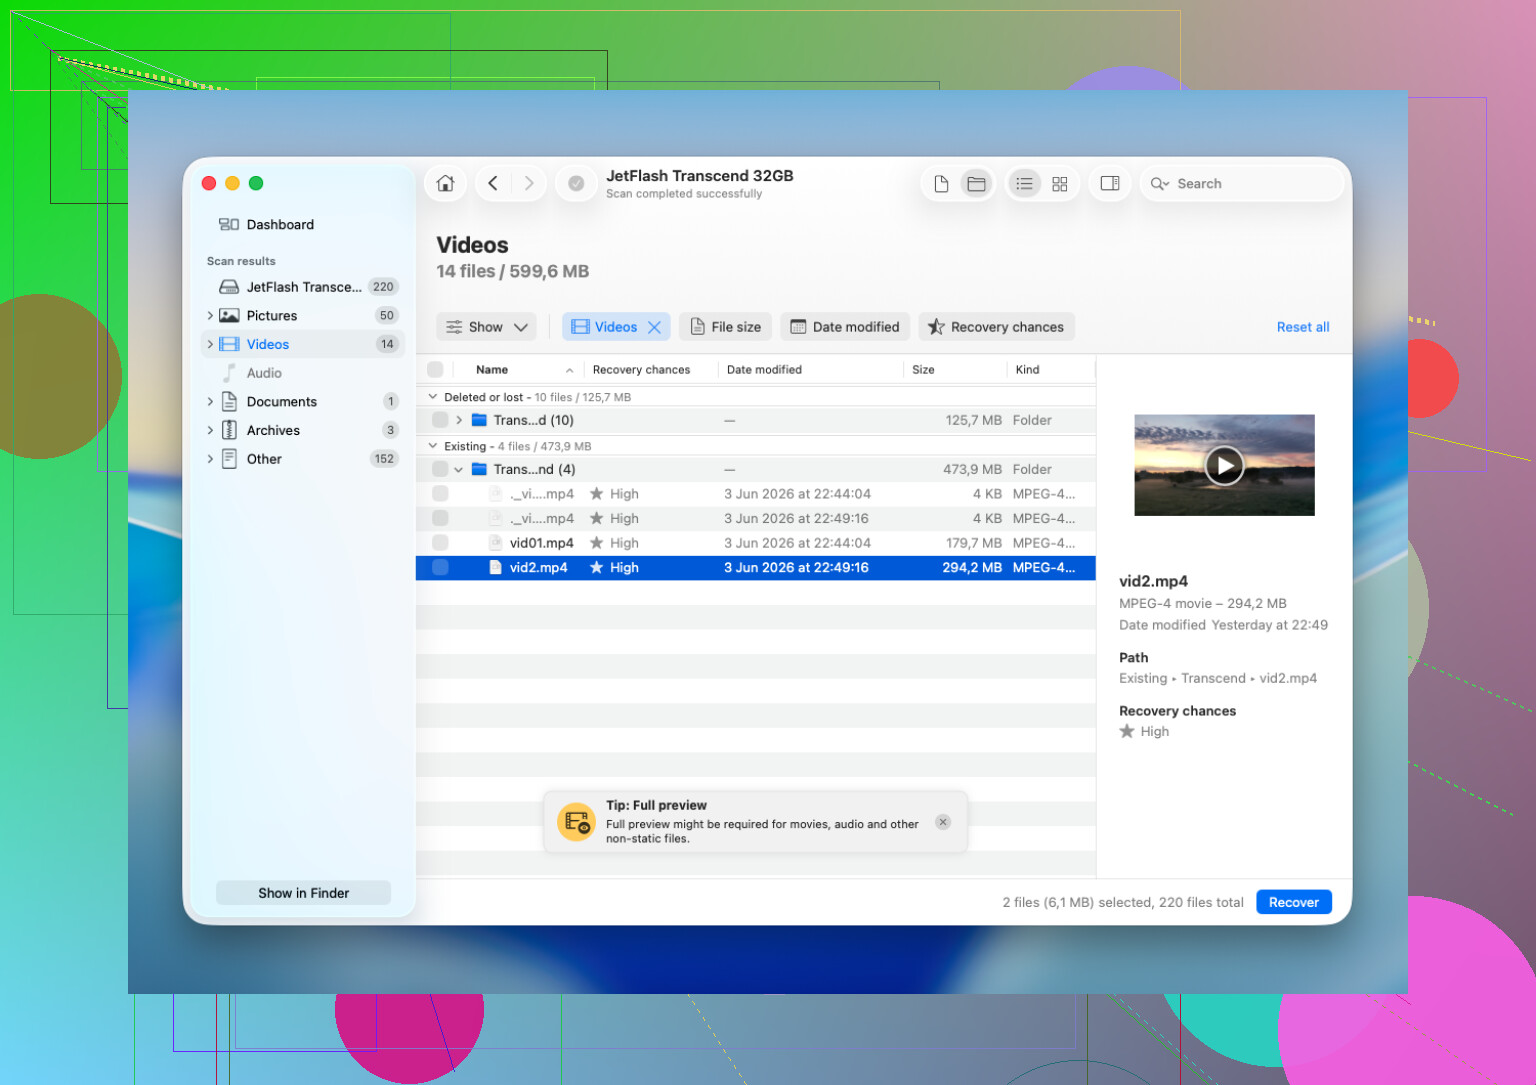
- Preview what shows up.
- Recover the files to a different drive.
That last part matters. Do not save recovered files back to the same memory card. Save them to your PC, an external SSD, anything else.
When software still makes sense
DIY recovery usually works best when the problem is logical, not physical. Stuff like:
- accidental deletion
- quick formatting
- file system corruption
- a card turning RAW
- missing files after a camera error
I’ve seen software recover footage in those cases even when the card looked pretty cooked from the outside.
When to stop and send it to a lab
There’s a point where trying more things yourself starts hurting your odds.
I’d stop and go with a recovery service if any of this is happening:
- The card has visible physical damage.
- It gets hot fast when plugged in.
- The computer never detects it at all.
- It keeps disconnecting during scans.
- The camera reports hardware-level errors.
- The footage has money or client value tied to it, and you can’t afford a bad gamble.
At that stage, repeated home attempts are how people make a bad card worse. A lab might have direct chip access gear and pull data in ways normal software won’t.
What I would do, in order
If you want the no-nonsense version:
- Stop using the card.
- Remove it from the camera.
- Use a card reader, not the camera USB port.
- Check File Explorer, then Disk Management.
- If the card is detected, scan it with software built for video recovery.
- Recover to another drive.
- If the card is unstable, hot, invisible, or physically damaged, stop there.
That sequence saved me from making the usual dumb moves. The main thing is speed, and then restraint. Once you start writing new data to the card, things go downhill fast.
4 Likes
Start with the simple checks before you assume the videos are gone.
If the transfer failed, your files might still be on the card but hidden, renamed, or sitting in a damaged folder structure. I’d first put the SD card in a reader, then check it on a second computer if you have one. Also turn on hidden files in File Explorer. I’ve seen DCIM folders look empty when the index got messed up.
One place I differ a bit from @mikeappsreviewer, I would copy the entire visible contents of the card to your PC first if the card still reads stable. Do it once. No dragging files around, no cut-and-paste. A plain read-only copy gives you a safer working set if the card starts failing later.
Then inspect the card with CHKDSK carefully. I know some people hate suggesting it, and for a dying card I agree, skip it. But if the card is stable and Windows sees a file system, chkdsk /f has restored lost directory entries for me before. It does not recover deleted clips well, but it sometimes makes ‘missing’ files show up again. If the card shows RAW, dont do this.
If the videos were deleted or the file table is damaged, Disk Drill is a solid pick for SD card video recovery. I’d use it after the visibility checks, not as step one. Scan the card, preview what opens, then recover to your hard drive.
Also check for these signs:
- Files show 0 KB, that points to corruption.
- Card size used space still looks high, files might be hidden or orphaned.
- Camera plays clips, PC does not, then the issue is often folder structure or codec handling.
- PC asks to format, file system is damaged.
If you want a visual walkthrough, this YouTube guide for SD card video recovery after a failed transfer covers the common checks and recovery flow pretty well.
Main thing, stop using the card now. Every new write lowers your odds a bit.
I’d handle this a little differently than @mikeappsreviewer and @sterrenkijker.
Before running anything that might ‘fix’ the card, make a byte-for-byte image of the SD card first if your computer still detects it. That gives you one frozen copy to work from, which is way safer than experimenting on the original media. On Windows, USB Image Tool or HDD Raw Copy Tool can do it. On Mac/Linux, dd or ddrescue if the card is flaky. If the card starts dying mid-scan, you’ll wish you had done this first.
Then compare a few things:
- Does the used space on the card still look about the same?
- Are the missing videos absent only on the PC, but still visible in-camera?
- Did the transfer app maybe ‘move’ files instead of copy them?
That last one gets people more than they think. Some import tools remove source clips after transfer, and if the transfer crashed halfway, you can end up with missing files on both sides. Super anoying.
One place I disagree a bit with the CHKDSK idea: I’d avoid it unless the files are clearly just hidden by directory damage and you’ve already imaged the card. CHKDSK can ‘clean up’ a filesystem in ways that are not always helpful for media recovery.
Also, check your computer first:
- search for the video file extensions directly: .mp4, .mov, .mts, .avi
- check the import folder, temp folders, and Recycle Bin
- look for weird file names or partial files with the right date/time
If the card image is made and the originals still aren’t visible, then yeah, Disk Drill is a reasonable next move for SD card video recovery. I’d scan the image file if possible, not the live card. That reduces risk a bit.
If recovered files won’t play, try VLC before assuming they’re dead. VLC opens a lot of half-broken clips other players reject.
Also, this thread is basically about recovering deleted videos from an SD card after a failed transfer, so that’s worth a read too if you want more examples of what people saw after a transfer crash.
I’m with @cazadordeestrellas on one thing: imaging first is the safest move if the card is even slightly unstable. I’m less sold on CHKDSK than @sterrenkijker unless you already have a full image, because “repairing” a filesystem can make later recovery messier.
One extra check I’d add: look at the card on your camera again. If thumbnails still appear there, the clips may not be deleted at all. Sometimes the PC just chokes on the folder index or the exact codec/container variant.
If you do scan, use Disk Drill on the image or the card in read-only fashion.
Pros for Disk Drill:
- good with SD cards
- previews recoverable videos
- simple enough if you’re stressed
- can find deleted plus lost partitions/file records
Cons:
- deep scans can take a while
- video recovery is not guaranteed if clips were overwritten
- preview does not always mean fully playable export
- paid recovery limits matter depending on version
Also test recovered clips in VLC before declaring them dead. Some “corrupt” files are just picky in normal players.
So my order would be: check in-camera, image the card, inspect used space, then scan with Disk Drill only after that.